Open Unity Hub → Select New Project → Select the Universal 3D template (may need to Download template) →
Create Project
In project settings, enter a project name (e.g. “Roll a ball”) and Location, then click Create Project, and wait for Unity Editor to open
Create new scene
Use default layout
Create new scene (ctrl + N) → Basic URP
Save as “MiniGame” in Scenes folder
Create a primitive plane
Use the hierarchy menu to add a 3D Objectject → Plane, then name it “Ground”
Select the Ground GameObject, then select Reset for the Transform component to place the Ground at the origin (0,0,0)
Press F to frame it within the scene view
Scale the Ground plane
Use R to scale
Scale precisely by setting X and Z scale values in the Transform component to 2
Create a Player GameObject
Create 3D Object Sphere named “Player”, set at origin, and press F
Change Y position to 0.5 to make it sit up on plane
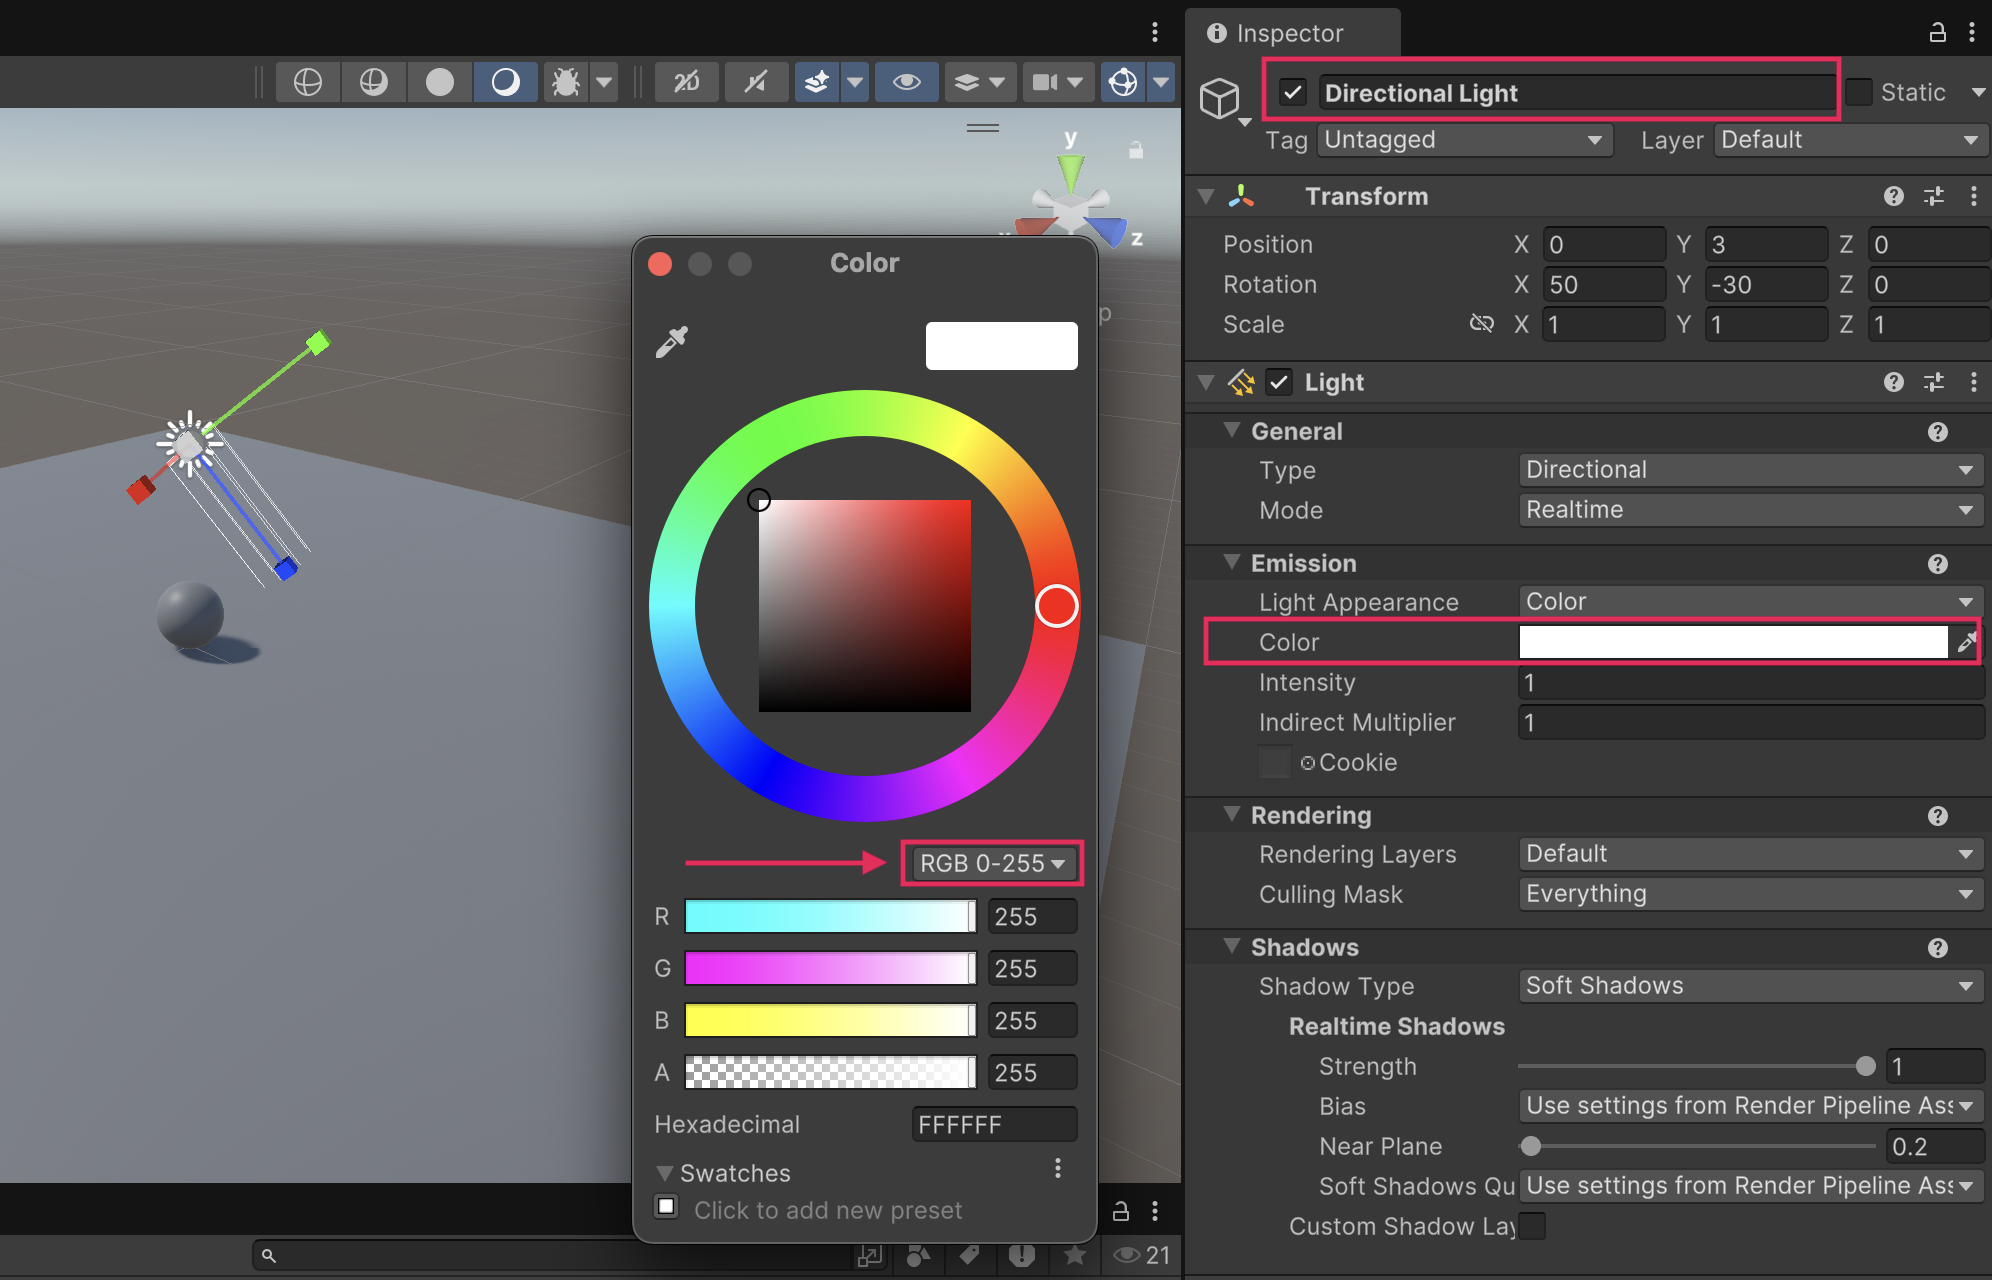
Adjust the default lighting
Change tint of directional light from yellow to pure white by expanding the Emission component and editing the RGB values in the Color window to 255, 255, 255.
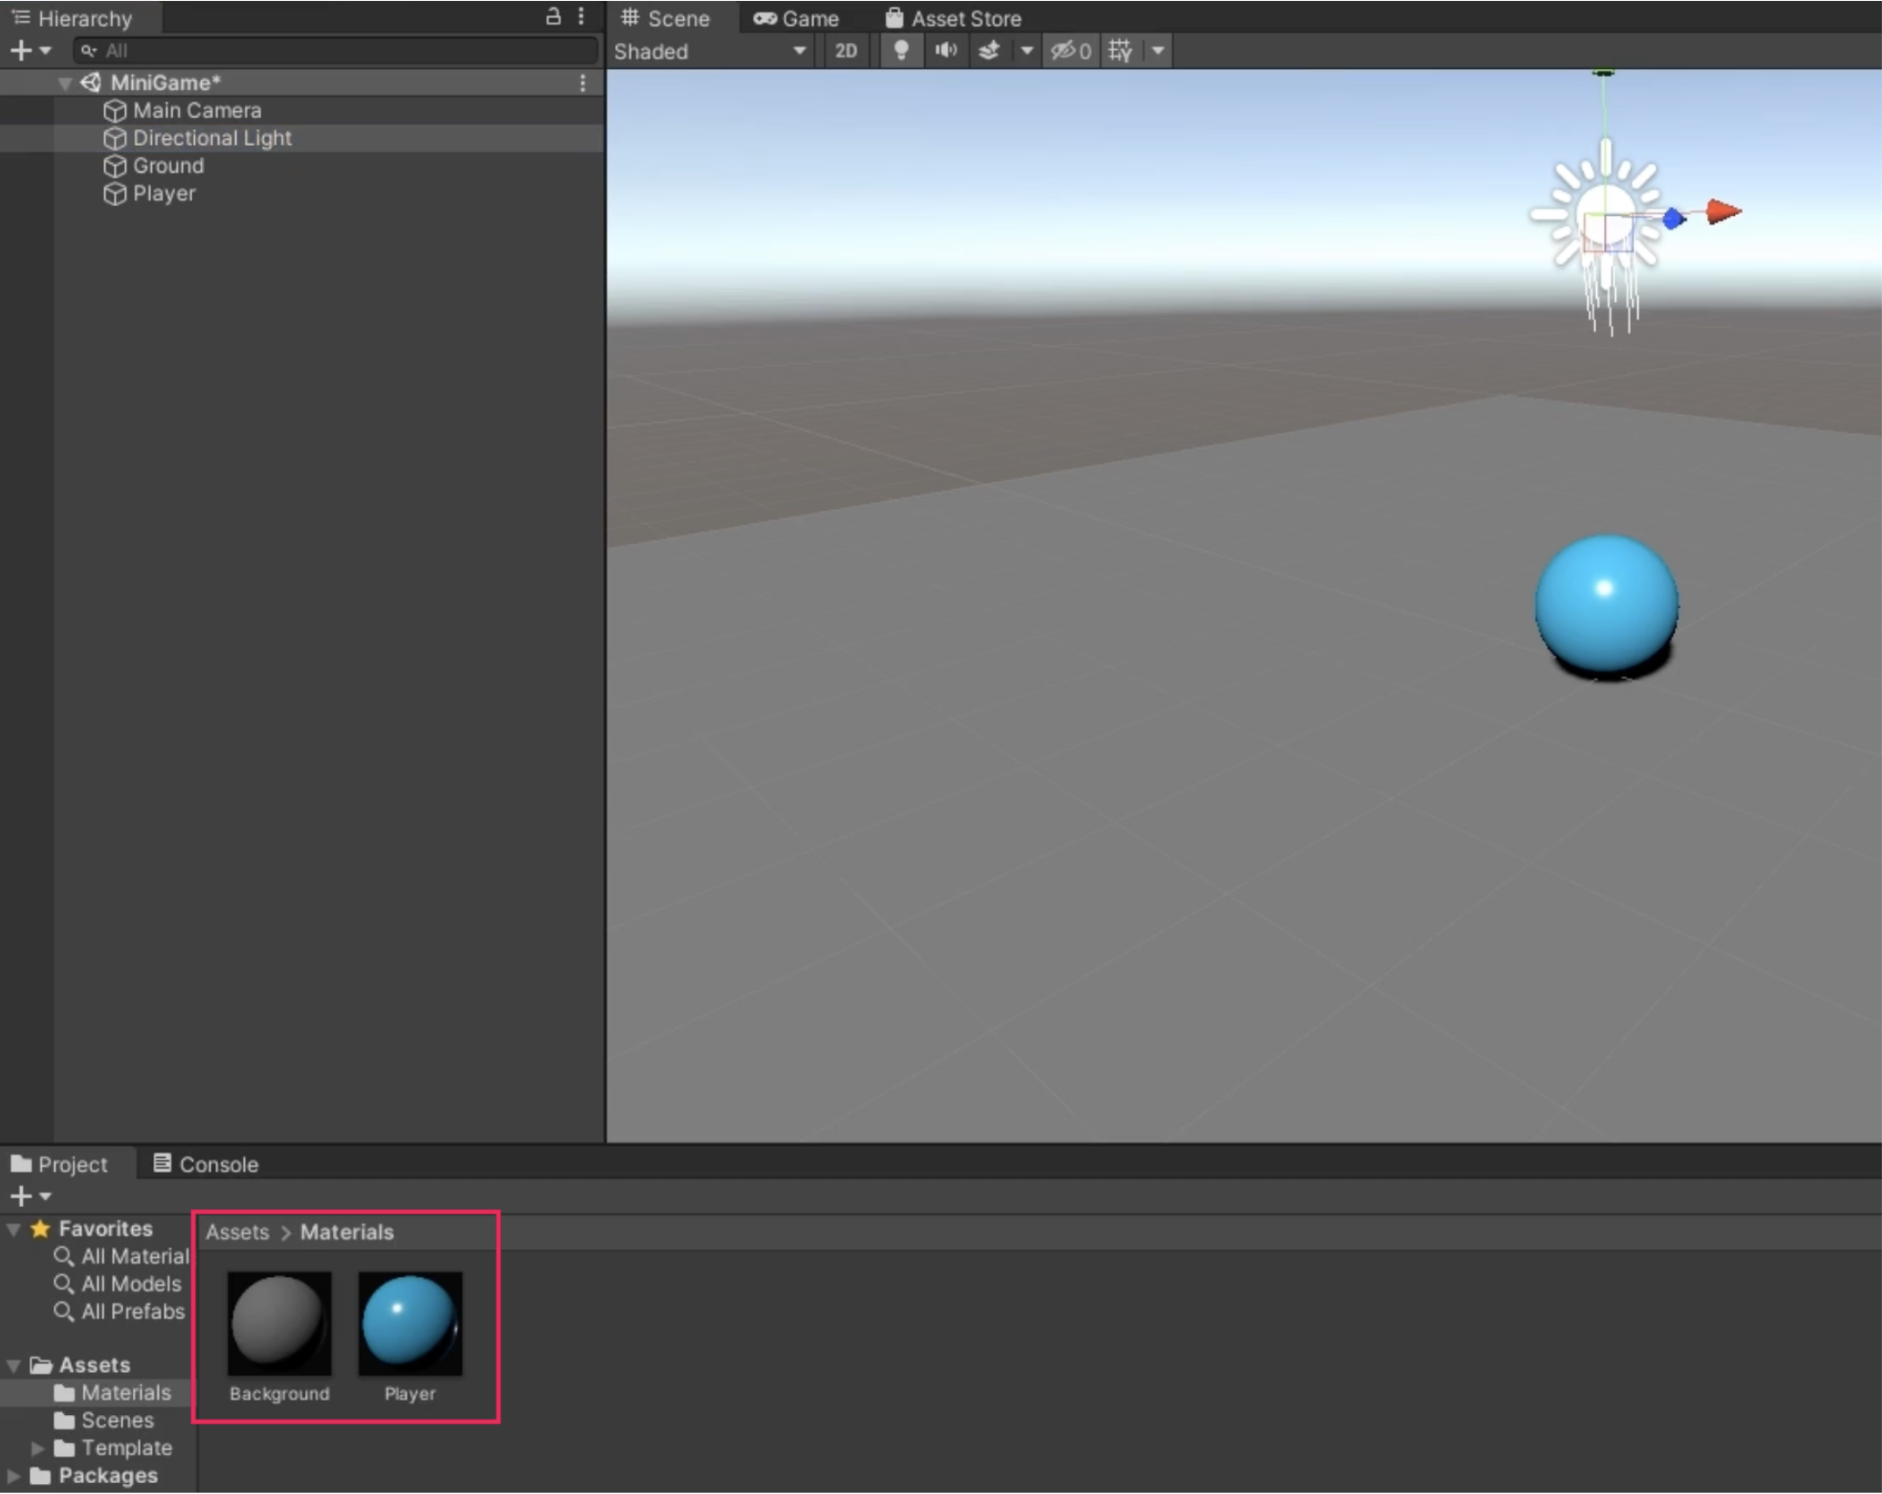
Add colors with Materials
Create a folder named “Material”, then right click it → Create Material named “Background”
Change Base Map color to pale gray (130, 130,130)
Set metallic map smoothness to 0.25
Drag the background to the Ground object
Create Material named “Player” and set its color to blue (0, 220, 255)
Give it a shiny finish (Set metallic smoothness to 0.75)
Assign it to the sphere
Rotate the Directional Light to provide better lighting to the Player by setting its Rotation to (50, 50, 0)
Allow the Player Object to interact with the Physics system by selecting Add Component → Rigidbody
Add a Player Input component
select Add Component → Player Input
Create a script
Create a Scripts folder
Select Player → Add Component → New Script → name it “Player Controller”
Move the script asset from the root level into the Scripts folder
Double-click it to open in a script editor (Visual Studio by default)
using UnityEngine;public class PlayerController : MonoBehaviour{ // Start is called once before the first execution of Update after the MonoBehaviour is created void Start() { } // Update is called once per frame void Update() { }}
Write the OnMove function declaration
using UnityEngine;using UnityEngine.InputSystem;public class PlayerController : MonoBehaviour{ // Start is called once before the first execution of Update after the MonoBehaviour is created void Start() { } void OnMove(InputValue movementValue) { }}
Apply input data to the Player
using UnityEngine;using UnityEngine.InputSystem;public class PlayerController : MonoBehaviour{ private Rigidbody rb; // Start is called once before the first execution of Update after the MonoBehaviour is created void Start() { // Get a reference to the Rigidbody component attached to Player object rb = GetComponent<Rigidbody>(); } void OnMove(InputValue movementValue) { Vector2 movementVector = movementValue.Get<Vector2>(); } void FixedUpdate() { }}
Apply force to the Player
using UnityEngine;using UnityEngine.InputSystem;public class PlayerController : MonoBehaviour{ private Rigidbody rb; private float movementX; private float movementY; // Start is called once before the first execution of Update after the MonoBehaviour is created void Start() { // Get a reference to the Rigidbody component attached to Player object rb = GetComponent<Rigidbody>(); } void OnMove(InputValue movementValue) { Vector2 movementVector = movementValue.Get<Vector2>(); movementX = movementVector.x; movementY = movementVector.y; } void FixedUpdate() { Vector3 movement = new Vector3(movementX, 0.0f, movementY); rb.AddForce(movement); }}
Fix the Player movement speed
Create a public variable speed so that it can be viewed in the Inspector.
Final script
PlayerController.cs
using UnityEngine;using UnityEngine.InputSystem;public class PlayerController : MonoBehaviour{ private Rigidbody rb; private float movementX; private float movementY; public float speed = 0; // Start is called once before the first execution of Update after the MonoBehaviour is created void Start() { // Get a reference to the Rigidbody component attached to Player object rb = GetComponent<Rigidbody>(); } void OnMove(InputValue movementValue) { Vector2 movementVector = movementValue.Get<Vector2>(); movementX = movementVector.x; movementY = movementVector.y; } void FixedUpdate() { Vector3 movement = new Vector3(movementX, 0.0f, movementY); rb.AddForce(movement * speed); }}
Move the camera to 3rd person view by setting Y position to 10 and X rotation to 45
Make the camera a child of the Player Object so that the camera moves with the Player
Test the game and then undo the parent-child relationship
Create CameraController script
For follower cameras, its best to use LateUpdate() to run after all other updates are done, so that the camera position won’t be set until the player has moved for that frame
Create a reference to the Player GameObject by dragging it into the Player slot in CameraController in the Inspector window
• Create a parent object for wall game objects by creating a new GameObject named “Walls” and reset its transforms,
• Create a Cube object named “West Wall”, then reset Transform, and make it a child of Walls
• Press F, then turn it into a wall by setting the scale to (0.5, 2, 20.5) and position it by setting x to -10
• Create a material named “Walls” with the following properties and then drag it to West Wall
○ set Base Map’s RBG to (79,79,79) for a darker gray
○ Metallic Map smoothness: 0.25 (matte finish)
Create remaining walls
Duplicate the West Wall and name it “East Wall” and set Transform position x = 10
Do the same for North Wall but set position x = 0, z=10 and rotate it 90 degrees around Y axis
Duplicate North Wall and rename it “South Wall” and set position z=-10
The Box Collider component allows for wall collisions- make sure Is Trigger is unchecked to make sure its used for collisions and not trigger events via script
Create a Text (TMP) object called “CountText” by right clicking → UI → Text - TextMeshPro → Import TMP Essentials, and set “Count Text” as placeholder
Select the Canvas object → press F → Select 2D view
Anchor CountText to upper left corner of Canvas
In the Rect Transform component, open Anchors and Presets, hold Alt + Shift → select top left anchor point
Note: Unlike other Unity objects, for UI objects, the standard Transform is replaced with the Rect Transform, which takes into account anchoring, positioning, and other features for a UI system
Display count value
Create SetCountText() to update score UI
In Player’s Inspector, drag CountText object into the Count Text slot
Create game end message
Create a TextMeshPro object named “WinText” with text “You Win!”
In the PlayerController script, create a variable “winTextObject” for displaying the text
Create an empty GameObject named “Enemy” positioned at the origin
Right click Enemy, and add a Cube named “EnemyBody” with position (0, 0.5, 0) and scale (0.5, 1, 0.5)
Create a material named “Enemy” and choose a color and then assign the material to the EnemyBody
Bake a NavMesh
Add a NavMeshSurface component to the Ground object and select Bake
To configure what to include, expand the Object Collection module → click Current Object Hierarchy → select Bake
Make the enemy chase the player
Select Enemy object → add Nav MeshAgent component, then set Speed to 2.5
Add new script “EnemyMovement”
In the script, create a NavMeshAgent variable to reference the Enemy and set its destination to Player
Assign Player object in the EnemyMovement script in the Inspector
using UnityEngine;using UnityEngine.AI;public class EnemyMovement : MonoBehaviour{ public Transform player; private NavMeshAgent navMeshAgent; // Start is called once before the first execution of Update after the MonoBehaviour is created void Start() { navMeshAgent = GetComponent<NavMeshAgent>(); } // Update is called once per frame void Update() { // Every frame, check if player exists if (player != null) { navMeshAgent.SetDestination(player.position); } }}
Test the game to make sure that the AI follows the player
Create static obstacles
Create obstacles by creating Cube objects of various shapes (scale and rotate) including a ramp to test the AI’s slope climbing
Make the obstacles child game objects of Ground so that the NavMesh includes them when baking
In Ground’s NavMeshSurface component, regenerate the NavMesh by clicking Bake- the area around the obstacles will be carved out of the NavMesh surface
Select Agent Type → open agent settings → adjust properties
Increase step height to allow agent to hop up onto higher surfaces
Increase max slope will allow the agent to climb steeper hills
Create dynamic obstacles
Create a Cube object named “Dynamic Box”
Create a new material named “Dynamic Obstacle” with any color and assign it to the Dynamic Box object
Add a RigidBody component and set the mass value to 0.2 to make it easier to be pushed around
Add a NavMesh Obstacle component to allow moving obstacles to affect the NavMesh during the game
by default, it will make the AI pathfinda round the obstacle
enble the Carve option creates a larger hole around the NavMesh to ensure the obstacle doesn’t get too close
Drag the DynamicBox into the Prefas folder to create a prefab
Make an empty parent object and duplicate and scatter DynamicBox prefab objects
Set win and lose conidtions
Select EnemyBody → Tag → Add Tag → create a tag named “Enemy”
Add an OnCollisionEnter() lose condition that destroys the player and says “You lose!”
private void OnCollisionEnter(Collision collision){ if (collision.gameObject.CompareTag("Enemy")) { // Destroy current object Destroy(gameObject); // Update winText to display "You Lose!" //winTextObject.gameObject.SetActive(true); //winTextObject.GetComponent<TextMeshProUGUI>().text = "You Lose!"; }}
Final scripts
PlayerController.cs
using UnityEngine;using UnityEngine.InputSystem;using TMPro;public class PlayerController : MonoBehaviour{ private Rigidbody rb; private int count; private float movementX; private float movementY; public float speed = 0; // UI text component to dislpay count of "PickUp" public TextMeshProUGUI countText; // UI object to display winning text public GameObject winTextObject; private int numPickups = 12; // Start is called once before the first execution of Update after the MonoBehaviour is created void Start() { // Get a reference to the Rigidbody component attached to Player object rb = GetComponent<Rigidbody>(); count = 0; SetCountText(); winTextObject.SetActive(false); } void OnTrigger() { count = count + 1; } void OnMove(InputValue movementValue) { Vector2 movementVector = movementValue.Get<Vector2>(); movementX = movementVector.x; movementY = movementVector.y; } void FixedUpdate() { Vector3 movement = new Vector3(movementX, 0.0f, movementY); rb.AddForce(movement * speed); Debug.Log(movement * speed); } private void OnTriggerEnter(Collider other) { if (other.gameObject.CompareTag("PickUp")) { other.gameObject.SetActive(false); count = count + 1; SetCountText(); } } void SetCountText() { countText.text = "Count: " + count.ToString(); if (count >= numPickups) { // Display the win text winTextObject.SetActive(true); // Destroy the Enemy GameObject Destroy(GameObject.FindGameObjectWithTag("Enemy")); } } private void OnCollisionEnter(Collision collision) { if (collision.gameObject.CompareTag("Enemy")) { // Destroy current object Destroy(gameObject); // Update winText to display "You Lose!" winTextObject.gameObject.SetActive(true); winTextObject.GetComponent<TextMeshProUGUI>().text = "You Lose!"; Debug.Log("You Lose!"); } }}
EnemyMovement.cs
using UnityEngine;using UnityEngine.AI;using TMPro;public class EnemyMovement : MonoBehaviour{ public Transform player; private NavMeshAgent navMeshAgent; // Start is called once before the first execution of Update after the MonoBehaviour is created void Start() { navMeshAgent = GetComponent<NavMeshAgent>(); } // Update is called once per frame void Update() { // Every frame, check if player exists if (player != null) { navMeshAgent.SetDestination(player.position); } }}